Thursday, November 1, 2012

Windows 8 KMS Activation

source: http://forums.mydigitallife.info/threads/38289-Windows-8-KMS-Activation

he following are instructions should a KMS server be discovered or released.
Make sure your computer's clock is accurate and your time zone is correct, then run the following commands in the Command Prompt as Administrator. replacing with a Windows 8 Compatable KMS server IP or hostname.

For Windows 8 Enterprise:

Code:
slmgr /skms 
slmgr.vbs -ato
For Windows 8 Professional: (Replace with a Windows 8 Professional KMS key from here.)
Code:
slmgr.vbs -ipk <KEY>
slmgr /skms 
slmgr.vbs -ato
KMS server List:
win8kms4.mooo.com - (IPv4) - INTERMITTENT - NOTE: This server redirects to the latest public KMS Server.


I installed WMC (Windows Media Center) can I still activate my copy of windows?
Do not use the released key to install WMC, you can NOT successfully activate Windows 8 with the public KMS server if you use the WMC key.


Can I back-up or restore my activation?
Yes. Please see this thread.

Microsoft Office 2013激活

在安装之后
按 win+x
选择命令提示符管理员(A)

然后复制下面的语句,并粘贴
slmgr /ipk 2B8KN-FFK6J-YWMV4-J3DY2-3YF29
按 Enter   运行

会提示更换密钥成功。之后选择联机激活就是。还没结束下面给等你点提示

WMC密钥,能永久激活WIN8

使用在微软免费领取的WMC key 将Kms激活的Windows8专业版变成永久激活教程!
由于免费领取的WMC Key有最晚使用限制,所以此方法2013年1月31日后将不再适用!!

领取WMC的激活码,
然后安装pro版的win8用KMS激活,
激活后在控制面板点 给windows添加功能
输入送的激活码,然后会给你安装 windows media center 并重启,就可以永久激活win8了。
WMC密钥领取地址:http://windows.microsoft.com/zh-CN/windows-8/feature-packs
领取免费的wmc key(领取时只需提供邮箱就行,可能发送会有延迟,可以多用几个申请,耐心等待。)

Tuesday, October 30, 2012

Database Mail to send alerts when SQL Server Agent jobs fail

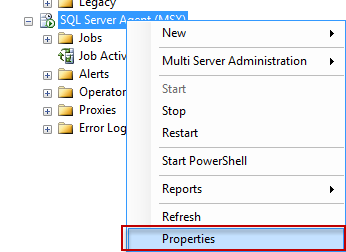
right-click SQL Server Agent (The MSX suffix in the screenshot is due to the Agent on this particular server acting as the Master in a multi-sevrer job administration) and select "Properties":
In the SQL Server Agent properties, head to the "Alert System" page, and there, in the Mail Session part of the page, check the box next to "Enable mail profile" to enable mail, and under "Mail System", set it to "Dabatase Mail". Under "Mail Profile", set it to "SQL Server Mail":

 Click "OK", right-click the "Operators" folder under SQL Server Agent, and select "New operator":

Define a name for the profile, and enter the mail account you want the mail to be sent to:
To ensure things will work correctly, it is usually a good idea to restart SQL Server Agent at this stage. This can be done either from SQL Server Configuration Manager, or directly from SQL Server Management Studio (SSMS) by right-clicking SQL Server Agent, and then selecting "Restart":

In the agent job general section, the only thing I filled out was the name: "Failing Job". In the "Steps" section, I created a new job step that selects data from a non-existing table in a non-existing database:
Then, on the "Notifications" page, I selected to have a mail sent to the profile created earlier if the job fails:
If all went well, you should receive a mail notifying you of the the job failure:

Wednesday, October 24, 2012

Resolve a “Couldn’t modify partition map because file system verification failed.” Error in Mac OS X

Partition Failed error

If you have attempted to partition a drive from Mac OS X and received a “Partition failed” message with the error “Couldn’t modify partition map because file system verification failed.” you can fix the problem with the file system check command line utility. To do this properly, you’ll need to boot into Single User Mode as well:
  1. Reboot the Mac into Single User Mode by holding Command+S during boot
  2. At the command prompt, type:
  3. /sbin/fsck -fy
  4. When fsck is complete, type “exit” or “reboot” to reboot
  5. Boot the Mac as usual, verify the disk again in Disk Utility, and partition as usual
Boot the Mac as usual and relaunch Disk Utility to verify the disk. Go ahead and partition the drive as usual, this time without any such error message.

Monday, October 15, 2012

华人&移民

华人对生命的理解就是比周围和认识的人更有钱,社会地位更高,老婆更漂亮,子女更优秀,仅此而已。而不是努力拓展自己的生命边界或者说去寻找自己的边界,不辜负上天给予的资源,比如外表,健康,智商,情商等。所谓压力纯属自找。移民,就仿佛重生一次,不是所有人都敢要这个经历。在新环境中能生存就很不错。若能发展,就是生命边界又拓宽一步!

Andriod 4.1.2升级窍门(for nexus 7 and more)

没收到系统升级通知,检测不到有版本需要升级,按如下办法

1、到settings,  apps, all, 里面找到Google service framework,
2、然后点force stop ,确定
3、再点clear data,  confirm
4、回到about,  system upgrade ,这个时候你看到的时间是1969
5、点check now


多试个3,5次一定可以监测到有升级的