Monday, May 28, 2012

高尔夫球具术语中英文对照

高尔夫球具(Golf Club)
 1、高尔夫球具之三主件分别为球头、球杆与握把。
 2、球头(Head):系球具组合中最重要的部份,包括铁头(Iron)、木头(Wood)与推杆(Putter)。
 3、球杆(Shaft):包含铁杆(Seet shaft)及石墨球(Graphte shaft)。
 4、握把(Grip):组合中最容易被忽视的,包含真皮、合成皮与橡胶三种材质。
Backweight(ing)
后重
为使重心 (Center of gravity) 后移,
于木杆球头( Wood Head )背部增加重量,
此加重物称为后重。
Biadelength
前刃长度
铁杆球杆 (Iron head) 最前端至跟部 (Hell)
之弯曲处,其长度称之。
Boring
颈孔
指球头颈部 (Neck) 之孔,装配 (Assembly) 时,
供球杆 (Sahft) 插入之用。
Bounce
(or Inversion)
翘角
当铁杆球头平置于打击位置时,
其底部 (Sole) 之前缘比后缘高。
Bulge
(or Hopizontal face)
水平弧形面
木杆球头面部 (Face) 呈水平之弧线。
Butt
大端或粗端
指球杆较粗的那一端。
Camber
圆弧底
指铁杆球头底部,自前缘至后缘,
或趾部 (Toe) 至跟部,其圆弧称之,
又称为 Rocker Sole , Radiused Sole ,
2 Way Sole & 4 Way Sole 。
Crown
顶部
指木杆球头最上方有弧度之区域。
Decals
水标
指贴印于球头表面之字体或图案。
Deep Face
高打击或高面仔
指木杆球头面部高于 15/8 者。
Effective Loft
(Also Real Loft)
有效倾角
指木杆球具,当面角 (Face Angel)
为正 (Square 0 度 ) 时,其倾角之角度。
Face
打击面
指木杆或铁杆球头击球部位。
Face Centerline
面部中心线
过面部与底线 (Sole Line) 垂直之线。
Face Depth
面高
指球头打击面之高度,一般分为低面仔、
普通打击面和高面仔。
Face Angel
面角
指目标线 (Target Line) 与打击面所构成之角度。
Face Progression
杆心面距
指球头打击面之最端至杆中心线
(Shaft Centerline) 之距离。
Ferrule
小胶套
指安装于球头杆端与球杆衔接处,使之平顺之物。
Forging
锻造
球头制造方式次一种,其材质较软。
Graphite
石墨
球头材质之一种,树脂 (Resin)
中含有碳纤维 (Carbglass) 。
Graphie Compostte
石墨复合材料
石墨材料中除有碳纤维外,还含有其它纤维,
如玻纤(Fiberglass) 。
Ground Line
地平线
一条平直之底线。
Head Width
球头宽度
指球头自前缘至后缘之距离。
Heel
跟部
指球头颈部与底部之连接处。
Heel/Toe Weigitting
跟 / 趾部重量
指球头跟部与趾部之重量分配,用以影响击球中心。
Hosel
杆部
指球头与球杆之连接处,颈部含于杆部之中。
Insert(or Inlay)
面板
镶入面部,以增加击球时承受撞击力之物。
Investment Casting
精密铸造
亦称脱腊法 (Lost Wax) ,是球头制造方式之一种,
其材质有 431、304(18-8),17-4PH,铜合金等多种。
Laminated
合板
一种生产木杆球头之材质。
Length-club
球具长度
亦称(Club Length),指自球头跟部至握把弧间之长度。
Lie
仰角
杆中心线与垂直于面中心线之地线,
两线所构成之角度, 仰角太大会造成翘头(Upright),
太小会造成低头 (Flat) 。
Loet
倾角
杆中心线与面中心线之间,两线所构所之角度。
Master
母模
制作球头时,最先完成之模型。
Neck
颈部
杆部与球头木体之连接处。
Offset
杆边面距
指头打击面之最前端至杆边之距离。
Preweter Weighting
外围重量
指球头重量特别分布于外围,
以扩前其甜蜜区(Sweetspot) 。
F…Simmon
柿木
最传统之木杆球头材质。
Roll
(or Vertical Face)
垂直弧形面
木杆球头面部呈垂直之弧形线。
Scoop(or Dig)
挖角
当铁杆球头平置于打击位置时,其底部之后缘比前缘高。
Set-Makeup
球具组
根据 USGA 规定,一套球具不得超出 14 支球杆。
Shaft Flex
球杆弹性度
根据弯曲仪,可测出球杆之弹性度,
一般可分为X ( 超硬 )、S ( 硬 ) 、
R (一般)、A(软)、L(女用) 等五级。
Shaft Frequnce
球杆震频率
根据震动测定仪,可测出其震动频率, CPN 为其单位。
Shallow Face
低打击面或低面仔
指木杆球头面部低于 11/8 者。
Slope Angle
斜角
指铁杆球头底线与刃部顶线,所构成之夹角。
Sole
底部
指球头与地面接触之部位。
Sole Angel
底角
指球头底部与地线所构成之夹角含翘角与挖角。
Sole Line
底线
指球头底部与地面接触,所产生之线。
Soleplate
底板
指球头底部之金属防护片,有加重及防磨损之作用。
Swing Weighting
挥杆重量
指测量挥杆时,其分配在球杆上之重量。
Target Line
目标线
指球具至目标开的一条假想线。
Tip
小端或细端
球杆较细的那一端。
Toe
趾部
球头之最前端。
Top Line
刃部顶线
球头面部上端与背上端之交会处。
Torque
扭力
挥杆时,对球杆造成之扭转力。
Trajectory
弹道
球被击出后,其飞行经过处。
Vise Pads
护套
保护木杆球头之套子。
Whhpping
绕线
木杆球头颈部通常会用尼龙线予缠绕,
以增强颈部之抗力弹性。
P SH
磨光指球头表面
之磨光程度
Mirror Finsh 亮光
Satin Finish 缎光
Wbration Finsh 震光
Hosel Shape
杆状指杆端之型状
Even 平杆: Wtth Eerrule
Round 圆杆: No Ferrule
Slope 斜杆: No Ferrule
Whipping 绕线: Wood Head Only

高尔夫球杆的英文叫法 & 基本知识

·1号木杆(Driver)
·球道木杆(Fairway Woods)
·长铁杆(Long Irons)
·挖起杆
·中铁杆(Middle Irons)

1.什么是木杆/铁杆?

木杆:过去的“木杆”当然是木造的(该名称的由来),但现在则有各种不同的材质。一般而言木杆的体积要比其它的球杆稍大。木杆是典型的长距离球杆,这表示它的距离比准确度来得重要。发球杆通常都是 '1' 号木杆,球杆面角度大致上在 8 至 12 度之间(球杆面角度 0 度表示与地面垂直)。

铁杆:铁杆原本是用铁造的,不过现在大多为钢制。铁杆比木杆小,通常被视为精致的球杆,使用上讲究准确度更甚于距离。

2.球杆的数字有什么意义?

大致上数字代表球杆的杆面角度。数字越低表示杆面角度越低,球杆越长。杆面越低球杆越长的结果是距离越远,但准确度就越低。这也等于数字越小的球杆越难打。

3.一套有多少球杆?

一套高尔夫球杆限定不得超过 14 支。整套的组成则视个人的喜好而定。

通常一套球杆包括下列几项:

铁杆: 3,4,5,6,7,8,9,PW

木杆: 1,3,5及推杆。这并不表示每次打球都必须携带这些球杆。初学者可携带一支发球杆(1 号木杆)或 3 号木杆,3,5,7 各一支,以及 9 号铁杆,外加一支推杆。

木杆的类型

木杆:基本上木杆有两种类型,柿树及枫树。 ‧坚硬的杆头通常用柿木。 ‧薄板层压(三合板)的杆头通常用枫木。 薄板层压的杆头以繁复的木工制成。制作过程类似复制一把钥匙。第二种,也是最常用的木杆是枫木制成的杆头。 一般而言,1/16 英?的枫木镶面板都是类似三合板的方式压制而成的。这类镶面板经过加热与加压,最后做成类似柿木的杆头。许多高尔夫球员指出,柿木杆头的撞击力感觉起来比较坚硬,但这并没有事实根据。有些高尔夫球员则比较偏好层压的枫木杆头,理由是必较耐用。

金属杆:包铸的金属杆头相当受欢迎,主要是因为外围的比重经过额外的控制(这并非原先的设计用意,而是产品的铸造过程让重量分布更适中)。不锈钢杆头铸成中空以免过重,中空部份通常灌注聚胺酯消减噪音。有不少人注意到用金属木杆的头挥杆时不管有没有击中中心都能增加距离。

石墨:杆身常用的材料也经常用来制成石墨杆头。两者的制作技术有些微的差异。石墨预浸胶体混合 ABS 塑料,并且射入杆头制模内。 第二种版本是以环氧基做成预浸胶体,然后将混合物压缩成模。石墨杆头制成的重量与木制及金属杆头一样,但通常比惯用的杆头尺寸更大。如此可增加「甜蜜点」的大小。不过试验结果并不能证实石墨杆头比其它材质的杆头更好挥杆或者距离更远。

加大尺寸:一般公认加大尺寸的杆头,通常是不锈钢或石墨制成,甜蜜点的面积比较大。即使击球时偏离中心,也可以让飞行的轨道更远、更直。如果使用不锈钢杆头,杆面必须更薄才能维持整体重量正常( 1 号木杆是 191 - 205 克)。这会造成某些金属木杆的杆面破裂或下凹。因此有些制造商正推出中型的金属木杆,让甜蜜点一样大,但杆头的厚度维持不变以免下凹。

金属杆基复合杆面:为了配合加大尺寸的杆头,制造商正开始利用杆面插入(通常是塑料、石墨或质轻的金属)。这可产生较大尺寸的杆面但不用担心杆面破裂或下凹。这也可以减轻杆面整体的重量。以金属木杆而言,杆面插入是一种相当新颖的设计,关于挥杆的动作与容忍错误的能力尚未有任何测试结果发表。

Wednesday, May 23, 2012

Stock Comments (20120520)

乱世之下,Return OF capital (保本)is more critical than return ON capital (盈利)

Tuesday, May 22, 2012

头像不能上传的解决方法

使用以下方法前请确认所使用的论坛为NT官方论坛所下载程序

1.检查论坛目录是否有networkservice完全控制权限
2.检查论坛目录下upload目录avatars目录是否继承了上级目录的networkservice完全控制权限
3.如果是IIS 7 检查论坛所使用的应用程序池"托管管道模式"是否为"经典",如果不是则改为经典. 注:IIS 5/6 版本可忽略此项
4.检查论坛所使用的应用程序池所使用的账户是否为networkservice

以上步骤设置完成后即可上传头像

注:如果以上步骤设置后还不可以上传,再给论坛添加IIS_IUSRS完全控制权限即可

source: http://nt.discuz.net/showtopic-141979.html

Thursday, May 17, 2012

How to remote reboot windows server 2008

In short answer: shutdown -r -m \\machinename(IP) /t 5
 
This shutdown utility is available at the command line in Windows Server 2008 and earlier operating systems going right back to XP.  Start by typing cmd; remember to 'Run as Administrator'.  Once the DOS box launches your first real decision is do you want to reboot (-r), or shutdown (-s) that server in another part of the network?
Note 1: The default with -r is the local machine!  Thus introduce the -m switch if you want a remote restart.
Note 2: While your 'victim' is probably a Windows Server, you can launch the command from Windows 7 or earlier Microsoft clients.
Warning:  Despite what anyone tells you, nobody gets to be an expert with Shutdown without accidentally downing the local machine instead of the target computer.  To recover from this mistake pay close attention to the syntax of Shutdown's abort switch -a.
Select Your ComputerName With -m
When you attempt to restart a remote Windows server always remember that the default computername is the local machine, therefore to access a remote server you need to append  -m ComputerName. 
The full command would be:
Shutdown -r -m \\BigServer  If the minus sign is unfamiliar, you could try
Shutdown /s /m \\BigServer, in this example, 'BigServer' is the hostname of the remote operating system.  None of these commands is case sensitive so sHUTDOWN -R -m \\bigserver would work just as well.
Note 1:  There is no space between the double backslash and the computername
\\  BigServer would not work.
Note 2:  If you substitute -s for -r that would mean shutdown.
Tip: For testing -m on the local machine, try 127.0.0.1
For example, shutdown -r -m  \\127.0.0.1  Such a command is useful in batch files.  Alternatively, to reboot numerous computers try PowerShell's command Restart-Computer.

Friday, May 11, 2012

CPU-Upgrade for Dell T110

source: http://www.cpu-upgrade.com/mb-Intel_%28chipsets%29/3420.html

Thursday, May 10, 2012

在Linux中使用cron命令

cron来源于希腊单词chronos(意为“时间”),是linux系统下一个自动执行指定任务的程序。例如,你想在每晚睡觉期间创建某些文件或文件夹的备份,就可以用cron来自动执行。
服务的启动和停止
cron服务是linux的内置服务,但它不会开机自动启动。可以用以下命令启动和停止服务:
/sbin/service crond start
/sbin/service crond stop
/sbin/service crond restart
/sbin/service crond reload
以上1-4行分别为启动、停止、重启服务和重新加载配置。
要把cron设为在开机的时候自动启动,在 /etc/rc.d/rc.local 脚本中加入 /sbin/service crond start 即可。
查看、编辑和删除
cron把命令行保存在 crontab(cron table)文件里,这个文件通常在 /etc 目录下。每个系统用户都可以有自己的crontab(在 /var/spool/cron/ 下)。要查看当前用户的crontab,输入 crontab -l;要编辑crontab,输入 crontab -e;要删除crontab,输入 crontab -r。如当前是root身份,要查看/编辑/删除/某用户的crontab,只需在相应的命令后加上 -u USERNAME(如 crontab -e -u USERNAME)即可。crontab文件的默认编辑器是vi,可以输入 export VISUAL=’editor’ 更改默认编辑器。
cron服务每分钟不仅 要读一次 /var/spool/cron 目录内的所有文件,还需要读一次 /etc/crontab 文件。配置这个文件也能让cron执行任务。使用crontab命令是对用户级任务的配置,而编辑 /etc/crontab 文件是对系统级任务的配置。
语法说明
以下是两个cron语句的例子(在 /etc/crontab 文件里)。前者用来晚间备份 /etc 目录,后者运行Analog程序处理服务器的统计信息。
12 3 * * * root tar czf /usr/local/backups/daily/etc.tar.gz /etc >> /dev/null 2>&1
52 5 * * * root /usr/local/src/analog-5.32-lh/analog >> /dev/null 2>&1
以下是cron语句中的字段与字段说明:

字段

说明

1

分钟(0-59)

2

小时(2-24)

3

日期(1-31)

4

月份(1-12;或英文缩写Jan、Feb等)

5

周几(0-6,0为周日;或单词缩写Sun、Mon等)

6

用户名(执行命令时以此用户的身份)

7

要执行的命令(路径)


现在来看第一行:
12 3 * * * root tar czf /usr/local/backups/daily/etc.tar.gz /etc >> /dev/null 2>&1
这条语句将在每天的凌晨3点12分(03:12) 运行 tar czf /usr/local/backups/daily/etc.tar.gz /etc 命令。>> /dev/null 2>&1 表示把所有标准输出发送到 /dev/null(linux的回收站),把标准错误输出(2)发送到和标准输出(1)同样的地方(即 /dev/null)。运行这行命令将不会产生任何输出。
这条语句可以变得稍微复杂一点:
30 15 13 6 1 * root tar czf /usr/local/backups/daily/etc.tar.gz /etc >> /dev/null 2>&1
它将在6月13日周一的15:30运行 tar czf /usr/local/backups/daily/etc.tar.gz /etc 命令。
以下语句可以达到同样的效果:
30 15 13 Jun Mon * root tar czf /usr/local/backups/daily/etc.tar.gz /etc >> /dev/null 2>&1
如果你想以用户joey的身份每小时的第15分钟运行某个程序,可以使用:
15 * * * * joey /usr/bin/somecommand >> /dev/null 2>&1
其中的星号(*)是通配符,表示cron将忽略这个字段。
如果你想每两小时就运行某个程序,可以在小时字段里使用 */2。它将会在2点,4点,6点……22点,24点运行。具体语句如下:
0 */2 * * * joey /usr/bin/somecommand >> /dev/null 2>&1
cron语句中还可以使用逗号(,)来指定多个时间。例如你想在每小时的15分和30分运行某个程序,可以在分钟字段使用 15,30:
15,30 * * * * joey /usr/bin/somecommand >> /dev/null 2>&1
如果你想在每月的第一周(即1号到7号)每天的指定时间运行某个程序,可以在日期字段使用 1-7:
15,30 */2 1-7 * * joey /usr/bin/somecommand >> /dev/null 2>&1
这条语句将在每月的第1-7日每两小时的15分和30分(02:15,02:30……22: 15,22:30等)运行 /usr/bin/somecommand 命令。
如果你想在每天的16:18执行一个脚本集合,可以把所有要执行的脚本放到一个目录中(如 /home/username/cron),可以使用:
18 16 * * * root run-parts /home/username/cron >> /dev/null 2>&1
如果你想保存某个程序的输出结果, 可以把 >> /dev/null 2>&1 替换为 >> /home/user/somecommand.log 2>&1 。
以下举几个例子说明问题:
每天早上6点
0 6 * * * echo "Good morning." >> /tmp/test.txt //注意单纯echo,从屏幕上看不到任何输出,因为cron把任何输出都email到root的信箱了。
每两个小时
0 */2 * * * echo "Have a break now." >> /tmp/test.txt
晚上11点到早上8点之间每两个小时,早上八点
0 23-7/2,8 * * * echo "Have a good dream:)" >> /tmp/test.txt
每个月的4号和每个礼拜的礼拜一到礼拜三的早上11点
0 11 4 * 1-3 command line
1月1日早上4点
0 4 1 1 * command line
总结
  • 查看当前用户的cron配置,使用 crontab -l
  • 编辑当前用户的cron配置,使用 crontab -e
  • 删除当前用户的cron配置,使用 crontab -r
  • 以root身份查看/编辑/删除某用户的cron配置,在命令后加上 -u USERNAME
  • 配置系统级的任务,编辑 /etc/crontab 文件


cron 是一个可以用来根据时间、日期、月份、星期的组合来调度对重复任务的执行的守护进程。
cron 假定系统持续运行。如果当某任务被调度时系统不在运行,该任务就不会被执行。
要使用 cron 服务,你必须安装了 vixie-cron RPM 软件包,而且必须在运行 crond 服务。要判定该软件包是否已安装,使用 rpm -q vixie-cron 命令。要判定该服务是否在运行,使用 /sbin/service crond status 命令。
cron 的主配置文件是 /etc/crontab,它包括下面几行:


SHELL=/bin/bash
PATH=/sbin:/bin:/usr/sbin:/usr/bin
MAILTO=root    #如果出现错误,或者有数据输出,数据作为邮件发给这个帐号
HOME=/    #使用者运行的路径,这里是根目录
# run-parts
01 * * * * root run-parts /etc/cron.hourly
02 4 * * * root run-parts /etc/cron.daily
22 4 * * 0 root run-parts /etc/cron.weekly
42 4 1 * * root run-parts /etc/cron.monthly
前四行是用来配置 cron 任务运行环境的变量。 SHELL 变量的值告诉系统要使用哪个 shell 环境(在这个例子里是 bash shell);PATH 变量定义用来执行命令的路径。cron 任务的输出被邮寄给 MAILTO 变量定义的用户名。如果 MAILTO 变量被定义为空白字符串(MAILTO=""),电子邮件就不会被寄出。HOME 变量可以用来设置在执行命令或脚本时使用的主目录。
/etc/crontab 文件中的每一行都代表一项任务,它的格式是

minute   hour   day    month    dayofweek    command

minute — 分钟,从 0 到 59 之间的任何整数  
hour — 小时,从 0 到 23 之间的任何整数  
day — 日期,从 1 到 31 之间的任何整数(如果指定了月份,必须是该月份的有效日期)  
month — 月份,从 1 到 12 之间的任何整数(或使用月份的英文简写如 jan、feb 等等)
dayofweek — 星期,从 0 到 7 之间的任何整数,这里的 0 或 7 代表星期日(或使用星期的英文简写如 sun、mon 等等)
command — 要执行的命令(命令可以是 ls /proc >> /tmp/proc 之类的命令,也可以是执行你自行编写的脚本的命令。)
在以上任何值中,星号(*)可以用来代表所有有效的值。譬如,月份值中的星号意味着在满足其它制约条件后每月都执行该命令。
整数间的短线(-)指定一个整数范围。譬如,1-4 意味着整数 1、2、3、4。
用逗号(,)隔开的一系列值指定一个列表。譬如,3, 4, 6, 8 标明这四个指定的整数。
正斜线(/)可以用来指定间隔频率。在范围后加上 / 意味着在范围内可以跳过 integer。譬如,0-59/2 可以用来在分钟字段定义每两分钟。间隔频率值还可以和星号一起使用。例如,*/3 的值可以用在月份字段中表示每三个月运行一次任务。
开头为井号(#)的行是注释,不会被处理。
如你在 /etc/crontab 文件中所见,它使用 run-parts 脚本来执行 /etc/cron.hourly、/etc/cron.daily、/etc/cron.weekly 和 /etc/cron.monthly 目录中的脚本,这些脚本被相应地每小时、每日、每周、或每月执行。这些目录中的文件应该是 shell 脚本。如果你想要增加一个任务到cron里,把运行任务的脚本(或者脚本的连接)放在对应的目录里;如果去掉run-parts这个参数的话,后面就可以 写要运行的某个脚本的完整路径名,而不是文件夹名了
以下是/etc/crontab的一个例子,该任务每周运行三次(星期一,星期三,星期五):
  02 4 * * 1,3,5 root run-parts  /etc/cron.weekly

  以下是一个新闻组上的例子,显示如何自动用电子邮件发送一个日记文件
  回复:help in crontab
  发信:Dean Thompson 日期: 2001-03-03 16:35
  Newsgroups: comp.os.linux.admin,comp.os.linux.networking,comp.os.linux.security
  > 我该如何在/etc/crontab文件里设置,让每天的工作记录文件自动发送到信箱abc@abc.com < /var/log?
你可以试试看以下的例子   
0 0 * * * (/bin/mail abc@abc.com < /var/log/messages) > /dev/null 2>&1

如果某 cron 任务需要根据调度来执行,而不是每小时、每日、每周、或每月地执行,它可以被添加到 /etc/cron.d 目录中。该目录中的所有文件使用和 /etc/crontab 中一样的语法。如下:

# record the memory usage of the system every monday
# at 3:30AM in the file /tmp/meminfo
30 3 * * mon cat /proc/meminfo >> /tmp/meminfo
# run custom script the first day of every month at 4:10AM
10 4 1 * * /root/scripts/backup.sh
根用户以外的用户可以使 用 crontab 工具来配置 cron 任务。所有用户定义的 crontab 都被保存在 /var/spool/cron 目录中,并使用创建它们的用户身份来执行。要以某用户身份创建一个 crontab 项目,登录为该用户,然后键入 crontab -e 命令,使用由 VISUAL 或 EDITOR 环境变量指定的编辑器来编辑该用户的 crontab。该文件使用的格式和 /etc/crontab 相同。当对 crontab 所做的改变被保存后,该 crontab 文件就会根据该用户名被保存,并写入文件 /var/spool/cron/username 中。
cron 守护进程每分钟都检查 /etc/crontab 文件、etc/cron.d/ 目录、以及 /var/spool/cron 目录中的改变。如果发现了改变,它们就会被载入内存。这样,当某个 crontab 文件改变后就不必重新启动守护进程了。
/etc/cron.allow 和 /etc/cron.deny 文件被用来限制对 cron 的使用。这两个使用控制文件的格式都是每行一个用户。两个文件都不允许空格。如果使用控制文件被修改了,cron 守护进程(crond)不必被重启。使用控制文件在每次用户添加或删除一项 cron 任务时都会被读取。
无论使用控制文件中的规定如何,根用户都总是可以使用 cron。
如果 cron.allow 文件存在,只有其中列出的用户才被允许使用 cron,并且 cron.deny 文件会被忽略。
如果 cron.allow 文件不存在,所有在 cron.deny 中列出的用户都被禁止使用 cron。
要启动 cron 服务,使用 /sbin/service crond start 命令。要停止该服务,使用 /sbin/service crond stop 命令。推荐你在引导时启动该服务。
增加cron的工作
当我们决定要在系统上定 期执行某个命令,我们必须将这个要执行的命令定义成一个cron工作,可以直接将要建立的cron工作定义在crontab设置文件中,设置该命令执行的 时机;或者也可以利用cron会定时执行/etc/cron.*目录SCRIPT的特性,将要执行的命令建立成为一个脚本文档,放置在该目录下,并且注意 它的权限--必须可以执行!


source: http://www.cnblogs.com/huqingyu/archive/2009/04/15/1436664.html 

Wednesday, May 9, 2012

How To Configure Trusted Sites In Internet Explorer For A Group Policy


Group policy is the magic behind Active Directory. Group policies are rules that either allow or deny – well pretty much anything on a machine. As a network administrator I get to use group policy to push out rules and regulations to my networked computers. These rules can tell the machine what applications are allowed to run, or in this case what sites are “trusted” in Internet Explorer.

Today I will show you how to add trusted sites to Internet Explorer using the group policy, without ever visiting the actual desktops. If you are new to group policy don’t worry, I will make this as easy and pain free as possible. If you do not know what the benefits of group policy are, let me give you an example. I have 278 computers on my network. I can either walk to each of them manually and add a trusted site list or I can push it out to all of them in one quick swoop.

Adding Trusted Sites to Internet Explorer Using Group Policy

For those of you who already know group policy I am sure you can just take a look at the screenshots below to find what you need.

You can open your Active Directory users and computers’ control panel by navigating to it on your Start menu by going to Program Files ““> Administrative Tools ““> Active Directory Users and Computers.
That will open a console that looks something like this:
trusted sites internet explorer group policy
If you want the policy to apply to your entire domain, right click at the top of the console. The domain is specified by three computers. If you want to apply the policy to another group or organizational unit right click on that instead. I will be using the organizational unit called editors. Choose properties from the context menu and then you will see the screen below:
trusted sites internet explorer group policy
Click on the Group Policy tab and then click the Open button. This will take us into the wonderful world of group policy. This is called the group policy management tool. The organizational unit will already be highlighted. Right click on it and choose Create And Link A GPO Here.
trusted sites internet explorer group policy
That will take us to the place where we can name the policy. Name it something that will make it easily identifiable. I chose AddTrustedSites for mine. Then click OK.
how to set internet explorer in windows group policy
You have just created your policy. Now we need to define the settings that we want to trickle down to our clients. Locate your policy in the right pane and right click on it. Choose Edit to get started.
how to set internet explorer in windows group policy
Now we need to drill down to the settings that we want to set. We need to go to the Computer Configuration ““> Administrative Tools ““> Windows Components ““> Internet Explorer ““> Internet Control Panel ““> Security Page and then double click to the zone assignment list in the right pane as you can see below.
how to set internet explorer in windows group policy
After you double click on site to the zone assignment list you will see a window to enable the settings and configure it. Click enabled. Then click show. On the show contents screen click add.
group policy
By clicking add we can add URLs and specify what zone we want them to be placed in like so:
group policy
The number 2 denotes the number of the zone. In this case it is the trusted zone. Microsoft breaks down the settings as follows:
  1. Intranet zone – sites on your local network.
  2. Trusted Sites zone – sites that have been added to your trusted sites.
  3. Internet zone – sites that are on the Internet.
  4. Restricted Sites zone – sites that have been specifically added to your restricted sites.
After clicking OK you can wait for your default refresh of Group Policy which is 15 minutes by default or you can run gpupdate.exe from any workstation to see if it worked. You can also restart the workstations to force the update.

source: http://www.makeuseof.com/tag/configure-trusted-sites-internet-explorer-group-policy/


Monday, May 7, 2012

如何利用挤空赚钱

选择SHORT RATIO比较高的个股
1. 等大盘大跌时,该股不跌或小跌
2. 无量连续小涨
你就大胆买来等着哪一天天量大涨后就抛掉。

How to move MailArchiva and its data from one server to another

These instructions describe how to move MailArchiva and its data from one server to another

Directories#

There is no complex database replication procedure to perform. Copying MailArchiva from one machine to another is as simple as copying a few directories over to another machine (almost!).
(1) Install a clean copy of MailArchiva on the new server.
(2) Copy the following directories & files from the old server to the new server

Server Configuration#

C:\Program Files\MailArchiva\server\webapps\ROOT\WEB-INF\conf\* (windows)
/usr/local/mailarchiva/server/webapps/ROOT/WEB-INF/conf/* (linux)

Logging Configuration#

C:\Program Files\MailArchiva\server\webapps\ROOT\WEB-INF\classes\log4j.xml (windows)
/usr/local/mailarchiva/server/webapps/ROOT/WEB-INF/classes/log4j.xml

License File (EE only)#

C:\Program Files\MailArchiva\server\webapps\ROOT\WEB-INF\classes\license.lic (windows)
/usr/local/mailarchiva/server/webapps/ROOT/WEB-INF/classes/license.lic

Audit & Log Files#

C:\Program Files\MailArchiva\server\logs\* (windows) /usr/local/mailarchiva/server/logs/* (linux)
C:\Program Files\MailArchiva\server\webapps\ROOT\WEB-INF\logs\* (windows)
/usr/local/mailarchiva/server/webapps/ROOT/WEB-INF/logs/* (linux)
C:\Program Files\MailArchiva\server\webapps\ROOT\WEB-INF\logs\index\* (windows)
/usr/local/mailarchiva/server/webapps/ROOT/WEB-INF/logs/index* (linux)\

Volumes#

Copy all files in all volume store paths and index paths
(copying indexes over is optional)
Since there are potentially a large number of files in the store path, on Linux when using the cp command you may receive the errors "too many arguments"
To workaround this, follow one of the methods in the following article: http://www.linuxjournal.com/article/6060
 
source: http://itdnext.blogspot.ca/2012/04/how-to-move-mailarchiva-and-its-data.html

Test Connection failes with an authorization warning

The problem

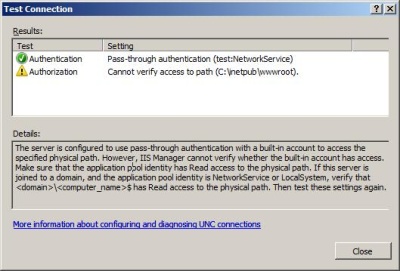
When you create a new website in IIS 7 and choose to "Test Settings", or when you do this on an existing website, you are prompted with an error. And this happens without you doing anything wrong, you just accepts the default values. The error is:
Cannot verify access to path
The server is configured to use pass-through authentication with a built-in account to access the specified physical path. However, IIS Manager cannot verify whether the built-in account has access. Make sure that the application pool identity has Read access to the physical path. If this server is joined to a domain, and the application pool identity is NetworkService or LocalSystem, verify that \$ has Read access to the physical path. Then test these settings again.
Test Connection - Cannot verify access to path

The explanation

You see this error message (actually it is a warning message) because you have choosen to use pass-through authentication. In this situation, the application pool is run under a low-privileged built-in account, usally Network Service, or ApplicationPoolIdentity. IIS cannot verify that the built-in account has proper settings, this can only be done at run-time.
In addition to this, the "Test Settings" process does not know which user you have authenticated as. So basically, you need to verify that the application pool identity has read access to the files and configuration files. You also need to make sure that the application identity has proper security settings.
So in most situations, you can safely ignore the warning message, because on a default setup, all the permission settings are correct.


Solution:
1- Open IIS 7.0
2- Select Default Web Site and Right-Click on it
3- Select Add Application... or Add Virtual Directory...
4- Select Contact as..
5- Change Path credentials: from Application user (pass-through authentication) to Specific user:
6- Add a Admin User with password like COMPUETRNAME\Administrator User


Additional information

If you set up the application pool to use a custom identity, you will not see this warning message. But, do not do this with the purpose of getting rid of the warning, since the warning may not mean anything to you.


source: http://www.it-notebook.org/iis/article/test_connection_authorization_failed.htm
http://amastaneh.blogspot.ca/2011/04/authorization-cannot-verify-access-to.html

Friday, May 4, 2012

Discuz!NT站点合并web.config文件方法


1.web.config简介
Web.config文件是一个XML文本文件,它用来储存 ASP.NET Web 应用程序的配置信息(如最常用的设置ASP.NET Web 应用程序的身份验证方式),它可以出现在应用程序的每一个目录中。
当你通过ASP..NET新建一个Web应用程序后,默认情况下会在根目录自动创建一个默认的
Web.config文件,包括默认的配置设置,所有的子目录都继承它的配置设置。
如果你想修改子目录的配置设置,你可以在该子目录下新建一个Web.config文件。它可以提供除从父目录继承的配置信息以外的配置信息,也可以重写或修改父目录中定义的设置。

2. 原先站点增加Discuz!NT论坛,合并web.config 问题:
例如论坛安装在 /bbs/ 目录里。
原理:
web.config文件中可以同时存在多个配置节,

但是要指明

注意其中 用 指名了作用的对象是bbs目录,而且不允许重写。如 果根目录某个类与Discuz!NT冲突,你也可以移除他,例如: 这行 从应用程序移除 ModuleRewriter 类,也就是让网站根目录程序的ModuleRewriter对bbs目录不起作用。


Source link: http://nt.discuz.net/showtopic-25114.html

Wednesday, May 2, 2012

Set the user’s Internet explorer home page via HKCU registry

Set the user’s Internet explorer home page via HKCU registry