Wednesday, June 29, 2011

Moving the Report Server (SSRS) Databases to Another Computer

You can move the report server databases that are used in a current installation to a SQL Server Database Engine instance that is on a different computer. Both the reportserver and reportservertempdb databases must be moved or copied together. A Reporting Services installation requires both databases; the reportservertempdb database must be related by name to the primary reportserver database you are moving.
Moving a database does not effect scheduled operations that are currently defined for report server items.
  • Schedules will be recreated the first time that you restart the Report Server service.
  • SQL Server Agent jobs that are used to trigger a schedule will be recreated on the new database instance. You do not have to move the jobs to the new computer, but you might want to delete jobs on the computer that will no longer be used.
  • Subscriptions, cached reports, and snapshots are preserved in the moved database. If a snapshot is not picking up refreshed data after the database is moved, clear the snapshot options in Report Manager, click Apply to save your changes, re-create the schedule, and click Apply again to save your changes.
  • Temporary report and user session data that is stored in reportservertempdb are persisted when you move that database.
SQL Server provides several approaches for moving databases, including backup and restore, attach and detach, and copy. Not all approaches are appropriate for relocating an existing database to a new server instance. The approach that you should use to move the report server database will vary depending on your system availability requirements. The easiest way to move the report server databases is to attach and detach them. However, this approach requires that you take the report server offline while you detach the database. Backup and restore is a better choice if you want to minimize service disruptions, but you must run Transact-SQL commands to perform the operations. Copying the database is not recommended (specifically, by using the Copy Database Wizard); it does not preserve permission settings in the database.
Important noteImportant
The steps provided in this topic are recommended when relocating the report server database is the only change you are making to the existing installation. Migrating an entire Reporting Services installation (that is, moving the database and changing the identity of the Report Server Windows service that uses the database) requires connection reconfiguration and an encryption key reset. For more information about migrating a Reporting Services installation, see Migration (Reporting Services)1.
If you can take the report server offline, you can detach the databases to move them to the SQL Server instance you want to use. This approach preserves permissions in the databases. If you are using a SQL Server 2008 database, you must move it to another SQL Server 2008 instance. After you move the databases, you must reconfigure the report server connection to the report server database. If you are running a scale-out deployment, you must reconfigure the report server database connection for each report server in the deployment.
Use the following steps to move the databases:
  1. Backup the encryption keys for the report server database you want to move. You can use the Reporting Services Configuration tool backup the keys.
  2. Stop the Report Server service. You can use the Reporting Services Configuration tool to stop the service.
  3. Start SQL Server Management Studio and open a connection to the SQL Server instance that hosts the report server databases.
  4. Right-click the report server database, point to Tasks, and click Detach. Repeat this step for the report server temporary database.
  5. Copy or move the .mdf and .ldf files to the Data folder of the SQL Server instance you want to use. Because you are moving two databases, make sure that you move or copy all four files.
  6. In Management Studio, open a connection to the new SQL Server instance that will host the report server databases.
  7. Right-click the Databases node, and then click Attach.
  8. Click Add to select the report server database .mdf and .ldf files that you want to attach. Repeat this step for the report server temporary database.
  9. After the databases are attached, verify that the RSExecRole is a database role in the report server database and temporary database. RSExecRole must have select, insert, update, delete, and reference permissions on the report server database tables, and execute permissions on the stored procedures. For more information, see How to: Create the RSExecRole2.
  10. Start the Reporting Services Configuration tool and open a connection to the report server.
  11. On the Database page, select the new SQL Server instance, and then click Connect.
  12. Select the report server database that you just moved, and then click Apply.
  13. On the Encryption Keys page, click Restore. Specify the file that contains the backup copy of the keys and the password to unlock the file.
  14. Restart the Report Server service.
If you cannot take the report server offline, you can use backup and restore to relocate the report server databases. You should use the ‘Copy_Only’ option. Beginning in SQL Server 2008, SQL Server Management Studio supports copy-only backups. After you restore the databases, you must configure the report server to use the database on the new server instance. For more information, see the instructions at the end of this topic.

Using BACKUP and COPY_Only to Backup the Report Server Databases

When backing up the databases, set the COPY_Only option and backup type to Full.
NoteNote
Be sure to back up both the ReportServer and ReportServerTempDB databases as well as their associated log files.
For more information on using SQL Server Management Studio to backup a database, see How to: Back Up a Database (SQL Server Management Studio)3

Using RESTORE and MOVE to Relocate the Report Server Databases

When restoring the databases, you can Use the RESTORE WITH NORECOVERY argument to perform the initial restore; this keeps the database in a restoring state, giving you time to review log backups to determine which one to restore. You would then repeat the RESTORE operation but use the RESTORE WITH RECOVERY argument.
NoteNote
Be sure to restore both the ReportServer and ReportServerTempDB databases as well as their associated log files.
For more information on using SQL Server Management Studio to restore a database, see How to: Restore a Database Backup (SQL Server Management Studio)4

How to Configure the Report Server Database Connection

  1. Start the Reporting Services Configuration tool and open a connection to the report server.
  2. On the Database page, click Change Database. Click Next.
  3. Click Choose an existing report server database. Click Next.
  4. Select the SQL Server that now hosts the report server database and click Test Connection. Click Next.
  5. In Database Name, select the report server database that you want to use. Click Next.
  6. In Credentials, specify the credentials that the report server will use to connect to the report server database. Click Next.
  7. Click Next and then Finish.
NoteNote
A Reporting Services installation requires that the SQL Server Database Engine instance include the RSExecRole role. Role creation, login registration, and role assignments occur when you set the report server database connection through the Reporting Services Configuration tool. If you use alternate approaches (specifically, if you use the rsconfig.exe command prompt utility) to configure the connection, the report server will not be in a working state. You might have to write WMI code to make the report server available. For more information, see Reporting Services WMI Provider5.

zettabyte

Monday, June 27, 2011

Understanding the Difference between Owners and Schemas in SQL Server

SQL Server 2005 introduces the concept of schemas as opposed to object owners found in previous versions. This article will explain the differences between the two and, hopefully, clear up some of the confusion that still exists about schemas.

Object owners

To understand the difference between owners and schema, let’s spend some time reviewing object ownership. When an object is created in SQL Server 2000 or earlier, the object must have an owner. Most of the time, the owner is “dbo”, also known as the database owner. It is possible that an object can be owned by any user account in the database. The way to determine the owner is by looking at the fully qualified object name which you can see using SQL Server Enterprise Manager or Management Studio when you are viewing a list of the tables. For example, the name of a table called orders owned by dbo is dbo.orders. If the table’s ownership is transferred to user abc, the table will now be named abc.orders.
How does an object get its owner? It depends on the user who created it. It is also possible for someone in the db_owner role to create an object owned by any user in the database. By default the user account that creates the object (the account must have CREATE TABLE permission) will also own the object. Only user accounts in the db_owner role can create objects owned by dbo. Even then, under certain circumstances, the owner will end up being the actual user account instead of dbo. See Undestanding Object Ownership for an in depth discussion of this issue
Using dbo as the owner of all the database objects can simplify managing the objects. You will always have a dbo user in the database. Users in the database will be able to access any object owned by dbo without specifying the owner as long as the user has appropriate permission. If an object is owned by an account other than dbo, the ownership must be transferred to another user if the original account is to be deleted. For example, if a non-dbo database user called “ted” creates the sales table, it will be called ted.sales. In order for users other than Ted to see the table, it must be referred to by the fully qualified name. If Ted leaves the company or department and his account must be removed from the database, the ownership of the table must be transferred to another user account using the sp_changeobjectowner stored procedure before Ted’s account can be removed.
If the table has been used in applications or referred to in any definitions such as stored procedures, changing the owner will now break all the code. If the dbo had owned the table from the start, there would have been no problem removing Ted’s account. The code would not have to use the fully qualified name, though there is a slight performance gain in doing so and is considered a best practice.

Schemas

I like to think of schemas as containers to organize objects. If you take a look at the AdventureWorks sample database (Figure 1), you will see that the tables are organized by department or function, such as “HumanResources” or “Production”. This looks similar to the old owner concept, but has many advantages. First of all, since the objects are not tied to any user accounts, you do not have to worry about changing the owner of objects when an account is to be removed. Another advantage is that the schemas can be used to simplify managing permissions on tables and other objects. The schema has an owner, but the owner is not tied to the name. So, if an account owns a schema and the account must be removed from the database, the owner of the schema can be changed without breaking any code. If you do not wish to organize your database objects into schemas, the dbo schema is available.
Viewing the fully qualified table name 
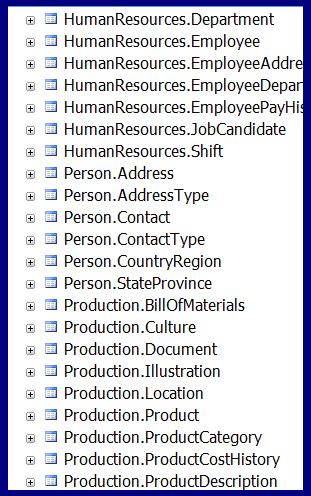
Figure 1: AdventureWorks tables with schemas.
Let’s say that the employees within the Widgets department are members of the same network security group, WidgetEmp. The managers of each department are members of an additional group, WidgetManagers. We create a schema called Widgets and many tables, views and stored procedures are contained in the Widgets schema. To control access to the objects, we could add the WidgetEmp and WidgetManagers network groups to the SQL Server and to the database. Because we are concerned about controlling access to tables, the WidgetEmp group has been given execute permission to all stored procedures in the Widget schema. The WidgetManagers group has also been given select permission to all the tables and views. The great thing about this is that you no longer have to remember to grant permission whenever a new stored proc, table or view is created as long as it is in the Widgets schema.
To grant execute permission to all stored procedures within a schema, follow these steps:
  • Using SQL Server Management Studio, expand Security then Schemas under the database.
  • Right-click on the schema name and choose Properties.
  • Select the permissions page and click Add to choose database users or roles.
  • Once the users or roles are selected, a list of permissions will fill the bottom box.
  • To grant execute permission to all stored procedures, check Grant next to the Execute item.
I have always wanted a database role that had execute permission on all stored procs. This would be similar to the db_datareader role. Now you can grant execute to all stored procs within a schema to achieve the desired result (see figure 2). I don’t know why a role like this doesn’t exist, but at least now there is a simple work-around. Even if you are not taking advantages of schemas in your database, you can give execute permission to stored procedures in the dbo schema to achieve the same result.
select and update permission on all tables and views in the schema 
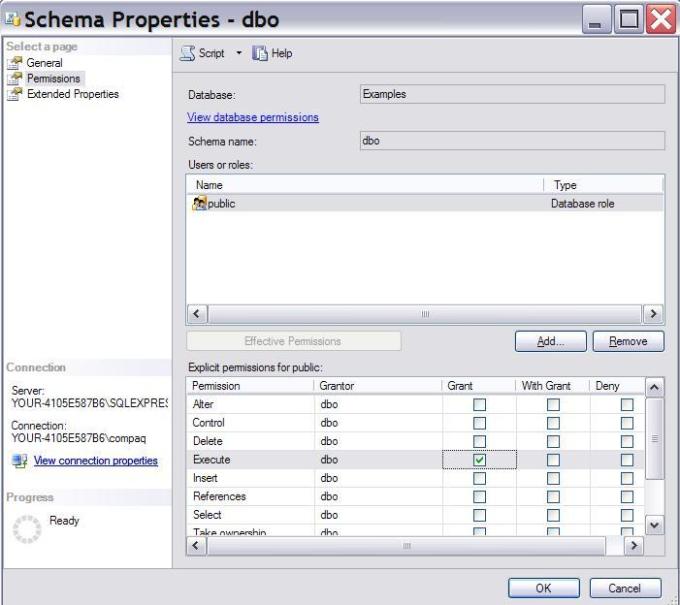
Figure 2: Grant execute permission on all stored procedures in the schema.
One important thing to keep in mind if you want to take advantage of schemas is that the schema organization must be considered early on in the design of the database. Changing the schema design late in the game could cause many changes to code.

Upgrading your database

What happens if you upgrade a database from SQL Server 2000 to 2005? When a database is upgraded from 2000 to 2005, a schema for each user in the database is created. You may not even notice this until you attempt to remove one of the user accounts. At that point you will receive the error message “The database principal owns a schema in the database, and cannot be removed”. To solve this problem just delete the schema first as long as it is empty. If the schema is not empty, you will have to decide whether to delete the objects first or transfer the schema to another owner.

Conclusion

While the concept of schemas is confusing at first, it has many advantages once you figure it out. Just think of the schema as a container to organize objects and simplify granting permissions as opposed to the earlier notion of owner. Most importantly, the schema organization must be considered early in the design process to avoid problems with code later on. Finally, by granting Execute permission in a schema to an account or database role, we now have a way to make sure that users can always execute new stored procedures.

source: http://www.sqlteam.com/article/understanding-the-difference-between-owners-and-schemas-in-sql-server

6种编写HTML和CSS的最有效的方法

写HTML5和CSS3,以及JavaScript,前端开发者有了大大的用武之地。大家都在用很多的工具和技术来武装自己,以加快前段的开发。   本文分享了6中最有效的方法,希望能提供你的效率,为你节约时间。
1. Dynamic CSS(动态 CSS)

如果你想加速你的CSS代码编写,那么你需要学习并掌握动态CSS。大部分的动态CSS增加了nested riles,variables, mixins, selector inheritance功能,这里提高代码的利用率。
2. HTML snippets(HTML 片段)

使用代码片段是个编写HTML代码的一个很快的方法。推荐Zen CodingHAML。首先,它会让你提速很快,其次,可以规避一些人为错误,因为所有的代码都是被测试和正确生成的。
3. CSS reset(CSS 重设)

CSS reset的优势是避免了浏览器的不兼容。推荐:Eric Meyer's CSS resetYUI.
4. CSS Grid layout(网格布局)

不少的开发者,都没有使用CSS 网格布局。网格布局的理念来自于传统的印刷出版,在web上,网格布局在杂志类型模板/网站中非常重要。该方法已经被大量的开发者证明是提升产品设计速度的有效途径。
CSS 网格布局具有很好的跨平台支持等特性,下面再介绍一些相关的资源:
5. HTML/CSS 编辑器

你需要一个好的代码编辑器,除了notepad之外,还有很多,它们各具特色。比如coda的ftp引擎十分的稳定。
6. 其他在线工具

下面的一些工具,还是可以帮助你省下那么一点的时间的。
如果你刚刚学习HTML和CSS,那么还是建议扎扎实实地来手写代码。如果你已经有了坚实的基础,那么就尝试上述的方法吧。
Enjoy coding :)
原文:http://www.queness.com/post/8004/6-most-effective-methods-to-code-html-and-css

重建索引提高SQL Server性能<转>

大多数SQL Server表需要索引来提高数据的访问速度,如果没有索引,SQL Server 要全表进行扫描读取表中的每一个记录才能找到所要的数据。索引可以分为簇索引和非簇索引:簇索引通过重排表中的数据来提高数据的访问速度;而非簇索引则通过维护表中的数据指针来提高数据的访问速度。

1. 索引的体系结构
        SQL Server 2005在硬盘中用8KB页 面在数据库文件内存放数据。缺省情况下这些页面及其包含的数据是无组织的。为了使混乱变为有序,就要生成索引。生成索引后,就有了索引页和数据页之分:数 据页用来保存用户写入的数据信息;索引页存放用于检索列的数据值清单(关键字)和索引表中该值所在纪录的地址指针。索引分为簇索引和非簇索引,簇索引实质 上是将表中的数据排序,就好像是字典的索引目录。非簇索引不对数据排序,它只保存了数据的地址。向一个带簇索引的表中插入数据,当数据页达到100%时,由于页面没有空间插入新的的纪录,这时就会发生分页,SQL Server 将 大约一半的数据从满页中移到空页中,从而生成两个1/2满页。这样就有大量的空的数据空间。簇索引是双向链表,在每一页的头部保存了前一页、后一页以及分 页后数据移出的地址。由于新页可能在数据库文件中的任何地方,因此页面的链接不一定指向磁盘的下一个物理页。链接可能指向了另一个区域,这就形成了分块, 从而减慢了系统的速度。对于带簇索引和非簇索引的表来说,非簇索引的关键字是指向簇索引的,而不是指向数据页的本身。
        为了克服数据分块带来的负面影响,需要重构表的索引,这是非常费时的,因此只能在需要时进行。可以通过DBCC SHOWCONTIG来确定是否需要重构表的索引。
2. DBCC SHOWCONTIG用法
        下面举例来说明DBCC SHOWCONTIGDBCC REDBINDEX的使用方法。以应用程序中Employee数据作为例子,在 SQL ServerQuery analyzer输入命令:
use database_name
declare @table_id int
set @table_id=object_id('Employee')
dbcc showcontig(@table_id)

 
输出结果:
 
DBCC SHOWCONTIG scanning 'Employee' table...
Table: 'Employee' (1195151303); index ID: 1, database ID: 53
TABLE level scan performed.
- Pages Scanned................................: 179
- Extents Scanned..............................: 24
- Extent Switches..............................: 24
- Avg. Pages per Extent........................: 7.5
- Scan Density [Best Count:Actual Count].......: 92.00% [23:25]
- Logical Scan Fragmentation ..................: 0.56%
- Extent Scan Fragmentation ...................: 12.50%
- Avg. Bytes Free per Page.....................: 552.3
- Avg. Page Density (full).....................: 93.18%
DBCC execution completed. If DBCC printed error messages, contact your system administrator.

 
通过分析这些结果可以知道该表的索引是否需要重构。如下描述了每一行的意义:
 
信息                                                          描述
Pages Scanned                           表或索引中的长页数
Extents Scanned                         表或索引中的长区页数
Extent Switches                          DBCC遍历页时从一个区域到另一个区域的次数
Avg. Pages per Extent              相关区域中的页数
Scan Density[Best Count:Actual Count]       
        Best Count是连续链接时的理想区域改变数,Actual Count是实际区域改变,
        Scan Density100%表示没有分块。
Logical Scan Fragmentation   扫描索引页中失序页的百分比
Extent Scan Fragmentation    不实际相邻和包含链路中所有链接页的区域数
Avg. Bytes Free per Page       扫描页面中平均自由字节数
Avg. Page Density (full)         平均页密度,表示页有多满

 
        从上面命令的执行结果可以看的出来,Best count23 Actual Count25。这表明orders表有分块,需要重构表索引。下面通过DBCC DBREINDEX来重构表的簇索引。
3. DBCC DBREINDEX 用法
        重建指定数据库中表的一个或多个索引。
语法
 
DBCC DBREINDEX
(    
    [ 'database.owner.table_name'    
        [ , index_name
            [ , fillfactor ]
        ]
    ] 
)      

 
参数
'database.owner.table_name'
        是要重建其指定的索引的表名。数据库、所有者和表名必须符合标识符的规则。有关更多信息,请参见使用标识符。如果提供 database owner 部分,则必须使用单引号 (') 将整个 database.owner.table_name 括起来。如果只指定table_name,则不需要单引号。
index_name
        是要重建的索引名。索引名必须符合标识符的规则。如果未指定 index_name 或指定为 ' ',就要对表的所有索引进行重建。
fillfactor
        是创建索引时每个索引页上要用于存储数据的空间百分比。fillfactor 替换起始填充因子以作为索引或任何其它重建的非聚集索引(因为已重建聚集索引)的新默认值。如果 fillfactor 0DBCC DBREINDEX 在创建索引时将使用指定的起始fillfactor
        同样在Query Analyzer中输入命令:
        dbcc dbreindex('database_name.dbo.Employee','',90)
        然后再用DBCC SHOWCONTIG查看重构索引后的结果:
 
DBCC SHOWCONTIG scanning 'Employee' table...
Table: 'Employee' (1195151303); index ID: 1, database ID: 53
TABLE level scan performed.
- Pages Scanned................................: 178
- Extents Scanned..............................: 23
- Extent Switches..............................: 22
- Avg. Pages per Extent........................: 7.7
- Scan Density [Best Count:Actual Count].......: 100.00% [23:23]
- Logical Scan Fragmentation ..................: 0.00%
- Extent Scan Fragmentation ...................: 0.00%
- Avg. Bytes Free per Page.....................: 509.5
- Avg. Page Density (full).....................: 93.70%
DBCC execution completed. If DBCC printed error messages, contact your system administrator.

 
        通过结果我们可以看到Scan Denity100%

Thursday, June 23, 2011

Schedule Auto Re-Boot of Windows Server 2008

This guide will help you to create a Task Schedule to Shutdown or Restart Windows Server Automatically. First, you have to download PSshutdown from Microsoft. Then create a Task Schedule:


If your schedule doesn't work, you can add one more argument "-accepteula" at the end. Or you just want to restart server then replace "-s" with "-r".

[tip] Prevent Windows Automatic Updates from rebooting your computer

Here's how to prevent Automatic Update from rebooting your machine:
  1. Start -> Run
  2. Type: gpedit.msc
  3. Expand Local Computer Policy / Computer Configuration / Administrative Templates / Windows Components / Windows Update
  4. Double-click "No auto-restart for scheduled Automatic Updates installations"
  5. Select "Enabled", then OK. Close the Group Policy configuration program.
Fine print:
  1. You need Administrator priveleges to make this setting.
  2. Some people complained that Windows ignored the "no auto-restart" setting for the WMF patch. Potentially a ID 10T error, though. 
Group Policy settings to disable Automatic Updates from rebooting computer

Wednesday, June 22, 2011

Microsoft SQL Server Analysis Services TCP port 2005 issues

Default instance of Analysis Services uses TCP port 2383. Named SSAS instances use dynamic ports. You can specify port that you want SSAS to listen in Analysis Services property "Port". If property "Port" is not specified (0), then port is picked dynamically. You can check dynamically assigned port in msmdredir.ini file located in %Program files%\Microsoft SQL Server\90\Shared\ASConfig. Find tag and tag for instance you are interested in. Example
<  Instances>
 <  Instance>
  <  Name>TestInstance1<  /Name>
  <  Port>12345<  /Port>
 <  /Instance>
<  /Instances>
If you are using SQL Browser service, it uses port 2382.

Friday, June 10, 2011

quick guide on how to upgrade your Transformer (any build) to a ROOTED WW 8.4.4.5 release (Android 3.1)

This is completely stock Android 3.1 but with root / Superuser and busybox added.

Please note that you follow this guide at your own risk! Although the process should not wipe your device, I advise backing up your data first.

PLEASE READ THESE INSTRUCTIONS THROUGH BEFORE YOU START!
  • Download the 8.2.3.9 update zip - DOWNLOAD (Mediafire Pro) - MD5: d8e37ec527dd8d701633cd337f767b5c
  • Extract the contents of the above zip (maintaining the directory structure) to a microSD card and insert in your Transformer. An update notification will appear in your system tray - click the notification and your device will reboot and rollback to 8.2.3.9.
  • Download the rooted 8.4.4.5 rooted update zip - DOWNLOAD (Mediafire Pro) - MD5: 4375ddec4d3470037d58cd2434cd8bf5
  • Copy the zip file to your microSD card. Do NOT extract it, just copy it as-is.
  • Download the 8.4.4.5 root utlity zip - DOWNLOAD (Mediafire Pro) - MD5: ca37aa989698d17e690d1a89ac025487
  • Extract the utility zip on your PC, and from a command prompt / terminal window at the location you extracted the files, enter the following commands (note that the Gingerbreak command may take a while), replacing adb with ./adb-mac or ./adb-linux as required:

    CODE
    adb push blob /data/local/
    adb push gingerbreakBB /data/local/
    adb shell chmod 4755 /data/local/gingerbreakBB
    adb shell
    /data/local/gingerbreakBB
    dd if=/data/local/blob of=/dev/block/mmcblk0p4
    reboot
  • Your device will now reboot and show a blue progress bar. When this finishes and the screen goes black, hold down the 'volume down' butotn. When prompted, press 'volume up' to enter ClockworkMod recovery.
  • Select 'install zip from sdcard' -> 'choose zip from sdcard' -> '8.4.4.5-rooted.zip' -> 'yes'.
  • Reboot your device from the menus and that's it, job done!
source: http://android.modaco.com/content/asus-eee-pad-transformer-transformer-modaco-com/341227/upgrading-to-rooted-ww-8-4-4-5-android-3-1-from-any-version/

The inner workings of Secure Boot key and Nvflash

What is Secure Boot Key and how does it work?

I’ve been getting lots of questions about this, so here is some simple background:
The secure boot key is an AES128 encryption key that can used to encrypt various data on the flash memory. It’s a generic nvidia tegra2 thing, that the manufacturer can optionally use to make their device more “secure”.
When the SBK is set, it’s stored in a one-time-programmable “fuse”. This also means that now that the key is out, they can’t change it on already released devices, only new devices.
When the tegra2 starts up, the AES key is available to the hardware AES engine only. E.g. not even the bootloader can read it back! However, the bootloader can *use* the key to encrypt whatever data it wants through the hardware AES engine. And here is the explanation why the blob flashing method actually works! The bootloader checks for the blob in the staging partition and encrypts and flashes it as needed.
Once the bootloader is done, it clear the key from the AES engine which makes it impossible to encrypt or decrypt things from within the OS.

So what happens when it boots into APX/Nvflash mode?

The basic APX mode is stored in the BootROM and hence can never be changed. It appears to accept only a very limited range of commands, and each command needs to be encrypted using the SBK to be accepted. If it receives a command that’s not properly encrypted, it disconnects the USB and appears to be off. This is the dreaded “0×4″ error that people have been getting when attempting to get nvflash working.
It should be noted, that even with the SBK inputted into nvflash, most regular nvflash commands won’t be available. I’m still not entirely sure why (and I can’t rule out it will change).
What *is* available, is the nvflash –create command. What this command does is repartition and format all partitions, set bct and odmdata and send over all  needed partitions to the device (and encrypt them as needed). This means a full recovery is possible, but regular ability to flash e.g. just boot.img or read partitions off of the device is not possible at this point.

So what do we need for nvflash?

In order to get a working (e.g. –create) nvflash, we need a few bits of information as well as some files:
  • Secure Boot Key
  • BCT file (boot device setup, ram configuration and a bit more)
  • ODM data (board-specific bit-field specifying various board settings. *Needs* to be correct
  • flash.cfg (e.g. list of settings and names/identifiers of partitions.
On top of these files, we also need all the partitions, e.g. bootloader.bin, boot.img, recovery.img and system.img. Luckily, these partition files are available in official ASUS updates and can be extracted from the blob file using my blob tools :)
The first four peices aren’t readily available, but through lots of effort and a good deal of luck, we have managed to recreate the needed files. Secure Boot Key has already been released (note that this was by far the hardest!) and the rest will most likely follow over the weekend. Keep in mind that we want to keep this legal, so don’t expect us to release any ready-made packs for unbricking! We will however make the recreated files available. Since these are recreated and not actual ASUS files, there should be no problems with them.

source: http://androidroot.mobi/tf-secure-boot-key/

Monday, June 6, 2011

如何加Widgets到Andriod平板电脑home screen

Long Method

Before you get started make sure you have space for a new widget on your home screen, if you have many widgets already filling your screen you will need to remove one of those widgets before proceeding. Since many Android phones come with multiple home screens you can always move things around or select a screen to dedicate to widgets.
Start by clicking on the Home key on your device so you can go to the home screen of your Android phone.
Next you'll need to click on the Menu button and you can then select the Add button on the screen. If you have an HTC Desire then it will say Add to Home, here's a screenshot.
Add to Home
After clicking on the Add button you'll then see the Widgets option among other icons. Click on Widgets in order to access all of the widgets currently found on your device.
Add Widgets
Once in the widget screen simply navigate to the widget that you want to place on your homescreen. Typically you will find several already available widgets, plus any you have installed yourself. You can scroll through your widgets if there are numerous options to choose from.
Select Widget
Simply clicking on the widget you want to use will then add that widget to your home screen. Click on your home screen button and if the widget appears you're all set for use.

Short Method

Plus Widget ButtonLong press on any empty space on your homescreen (a long press will last a couple of seconds). You'll then notice the Widgets option just as you would with the longer method. Click on the widget menu then click on the widget you want to install, this will place your widget on your Android home screen.
On HTC phones you can also use the + button at the bottom right to add widgets. You can see it highlighted in this screenshot. The rest of the process is exactly the same.

Working with Widgets

If you want to move a widget then simply hold your finger on it. It will detach with a vibration feedback and you can then move it around to the position you want. If you want to delete it then select it in the same way until it detaches and then drag it to the trash can at the bottom of the screen.
Move or delete widget
The widget in that screenshot is the Power Control widget that you'll find on many HTC Android phones and it's extremely handy for quickly turning data, Wi-Fi or Bluetooth on or off. There are loads of other great Android widgets worth checking out so take advantage and grab the ones that interest you. They are great time savers.

什么是Ispostback?怎么理解?

1.就是判断是否从服务器第一次传来页面,当页面第一次打开时为false,因为不是postback,从第二次开始就是true了.如想在页面上的dropdowmlist中在页面第一次就添加数据,而不是每次都添加,那就再page_load()里用if(!ispostback)

2.控件的值改变以后,如果控件的autopostback=true,就会有一个刷新页面的动作,那个动作就叫ispostback

3.另外可以这么理解,在需要每次页面Load的时候,根据需要把每次都要加载的代码放在IsPostBack中,把只需要加载一次的代码放在if(!IsPostBack)中.每次用户回传服务器任何信息的时候,都会引发isPostBack属性.用来判断此用户是否曾经做过登陆或者其他事件